Monday, January 24, 2011

Pinterest


Have you tried Pintrerest yet? No? What are you waiting for?

Pinterest is a website for visual bookmarks with an added bonus of being social. Instead of having a million folders of bookmarks and a folder on my desktop for photos of inspiration I can now organize all my favorite things in neat little boards.


You can browse others virtual bulletin boards and repin their ideas. You can follow your friends and have their inspirations guide you in gift giving. You can create a virtual recipe box complete with drool worthy pictures. But a warning- you can also get lost in this awesome little eye candy world for hours!

Thursday, January 13, 2011

Quilt Along: Step 2

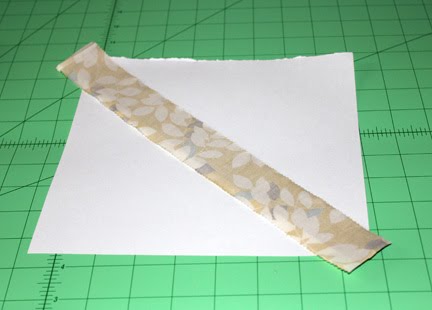
After the left step you should be left with a bunch of paper squares with a strip of fabric glued across the diagonal.

Lay one of your strips over your constant strip right side down. Sew along the edge using a 1/4th" seam allowance.

REDUCE YOUR STITCH LENGTH!! I normally keep my machine at a 2 or 3. For paper piecing you should reduce it to somewhere between 1 and 2. You'll need to play around with your machine to see what works best for you. You want your stitches to be small enough to perforate the paper and make it easy to tear away yet if its too small the paper tears away on its own when you are sewing.


Finger press the seam open and repeat on the other side of the strip.


Press both sides open.


I'm a big fan of not pressing my seams but its necessary with this method. If you absolutely can not stand the thought of ironing at least make sure to hold your strips taunt when you apply the next strip.

Work your way out until you cover your entire square. It should look something like this:

Press your block a final time and then flip your square over and use your paper as a template for trimming up your block.


That's it! You completed your first block!

Wednesday, January 12, 2011

Quilt Along: Step 1


Ok! So several of you are having mini panic attacks over this.

Stop! Take a deep breath. This is fun, remember?

I know the unknown is always a bit panic educing but you're making it harder than it needs to be, I promise!

I'm making a large throw size. I've worked out that I want my blocks to be 8.5". I will arrange them in a 6x9 fashion so that my finished size before boarders will be 48" x 72".

I selected my square size based on the paper I have on hand and based my dimensions off of that. Remember, you will lose 0.5" of each block due to seam allowance.

Step One: Cut your squares. Pages out of a phone book work extremely well. The thinner the paper, the better. I used regular printer paper because that is what I have on hand.
If you use printer paper you will be cutting a 2.5" strip off of the top of each page. (save that strip, perfect for hexagons!)

Step Two: Cut your 1" constant strips. If you're using an 8.5" square these strips will be 12" long. If you are not using a constant you can just pull from your scrap pile and cut one 1" x 12" strip for each block.

Step Three: Using your glue stick attach the constant fabric across the diagonal of your paper square. I use just a spot of glue at each end. They should look like this:


Tomorrow we will work on construction of the rest of the block!

Sunday, January 9, 2011

Hopefully you've started to gather your fabric for our quilt along! Here is a list of supplies that you will need.

  • A quilting ruler and rotary cutter will be extremely helpful when you're trimming up your blocks.
  • Paper or muslin for piecing. You would need one square for each square of your fabric. The thinner the paper, the easier it will be to rip off. I suggest using an old phone book.
  • glue stick
  • Thread- for piecing I generally just use white. You'll want a coordinating color for your quilting.
  • Batting- I prefer Warm & White or Warm & Natural for cotton batting. You may also use bamboo or a polyester if you choose.
  • Basting pins (safety pins will work!) or an adhesive spray.
  • Either a walking foot or free motion quilting foot is highly recommended. If you would like to do simple straight line stitching you can make it through without a walking foot if you don't want to make the investment. A walking foot just makes things easier.

Wednesday, January 5, 2011

Welcome to the quilt along!


Welcome to our very first quilt along!

Some of you are seasoned quilt makers, some are pretty new and some have never even attempted a quilt! That's okay! This is a simple pattern and you can go at your own pace. You can start and stop at any time and rejoin again when life allows. You do not need to be a Fabric Fans member to participate! The more the merrier so invite your friends! There is no need to officially sign up, just jump right in to our Flickr group.

We have selected a string block as our design for this round. It's great to use up scraps or you can achieve a more pulled together look by using only a certain collection or color scheme.

Sizing of the quilt is completely dependent on you and your fabric supply. As a guideline common sizes for quilts is as follows:

Baby Quilt: 36" x 54"
Lap Quilt: 54" x 72"
Twin Quilt: 54" x 90"
Double Quilt: 72" x 90"
Queen Quilt: 90" x 108"
King Quilt: 108" x 108"

If you are new to quilting I suggest starting with a smaller quilt and not going above a Twin size. Wrangling all the fabric through your machine when quilt can be a bit challenging. Of course it IS possible and I can successfully quilt up to a Queen on my standard machine.

Fabric requirements:
You will need strips from 1"-2.5" inches wide (These can be uniform or of varying widths depending on your desired looked). As I said before this can be completely from scraps or you can cut from yardage. You will also need a 1" strip of one constant fabric for each block. I love the look of a solid, but I have also seen people use a pattern and it looks great.

How much you need is based on the quilt size. To be safe, I like to take the surface area of the quilt and multiply that by 1.75. This allows for a scrappy binding, seam allowance and error.

For example, if you were making a lap size quilt (54" x 72") the surface area would be 3,888". Multiply that by 1.75 and you have 6,804". This means you would need 4.5 yards for the front of your quilt.

You will also need enough fabric for the back of your quilt and if you choose not to do a scrappy binding you will need enough fabric for the binding. (For a lap size you would need a little less than a half yard.)


Up next will be a complete supply list. This is just enough to get you started pulling fabric choices! And don't forget to upload a pic of your fabric to the Flickr Group!

Sunday, November 7, 2010

Caramel Apple Crunch

Everyone in blogland has been raving about Pumpkin Crunch lately and while it sounded good, I'd rather starve to death than eat pumpkin anything. Still, I was intrigued. I started with the main idea of pumpkin crunch but switched out the filling and changed up the crust a bit. Enjoy!

You will need
1 box cake mix (I used Betty Crocker Butter flavor)
3 large eggs
1/2 c melted butter
Apple Butter- I used half of a large jar
2T milk
1 tsp vanilla
1/4c sugar
1T flour
1c Old Fashioned Oats
1c dried apples- chopped
1/2c craft caramel bits
1T cinnamon


Reserve one cup of cake mix and set aside.

In a bowl combine the rest of the cake mix, one egg and 1/2c of melted butter. Spread in a greased and floured 9x13 pan.

Combine apple butter, 2 remaining eggs, 2 tablespoons milk, 1 cup of chopped dried apples and 1/2 cup of caramel bits. Mix well and spread over the cake mixture in pan.

Combine remaining ingredients and sprinkle evenly over the apple butter.

Cook for 35 minutes in a 350 degree oven.

Thursday, July 15, 2010

Quick pajama pants tutorial

Alright, I'm assuming SOME sewing knowledge here which I'm sure you guys can handle. If there's any questions you can feel free to email me and I'll do my best to clarify.The first step is to take an existing pair of pants that fit well. Ideally, these will also be pj pants, but if you use something like a pair of jeans you could just allow extra seam allowance.
Fold your pants in half. There's a little notch in the butt area. Make sure that is pulled out. Place your pants on the fold of your fabric like this:


You will cut along your pants, leaving a seam allowance. Leave extra room at the top (about an inch and a half) for the casing and an extra inch on the bottom for the hem. Your butt area probably draws in quite a bit. You'll need to account for the elastic though, so I do mine almost straight up. My child also has a little extra junk in the trunk if you know what I mean. If you or your child is on the less endowed side you'll be able to taper in a bit more.
Here's my pants after I cut the first leg. I allowed extra room because these were last years pants and the little one grows like a monster! You'll need to cut another leg exactly like this! Don't forget to place it on the fold.If you use a serger you can serge the bottom edge of your legs now. If not, you can just fold it over an extra time when you hem.
Then, fold your leg in half placing the right sides together. You will sew up the lower leg ONLY. I serge but you could also zig zag or use a french seam. Stop when you hit the butt notch. (Yes, I am officially naming it the butt notch.) In the picture below the thin blue line indicates the top, or the waist. The arrow indicates where you should be sewing. Do this to both legs.

Here's where it gets a bit tricky to explain. Turn one leg right side out. The right side out leg should be placed INSIDE of the inside out leg. Essentially the right sides of the legs are together. Line up your edges. It should like this:
Sew your edges together. It will be like sewing a large "U" shape. You can serge or again you can zig zag or whatever you're comfortable with. After that I remove the leg from inside of the other leg. The pants will be inside out. I reinforce all of my seams with just a straight stitch. I also serge along the waist.

Hem the bottoms- if you zig zagged or serged you can just fold the edge over and straight stitch it down. If you didnt or you want a more finished look, you would fold your bottom once and then again to hide your exposed edge.
You're almost done! All you need to do now is to create your casing for your elastic. I like to use 1" pajama elastic. The absolute easiest way its to start with a long length and simply fold your fabric over the elastic as you sew.

Once you get about a half inch from where you began back stitch a bit and then remove the fabric from your machine. Tighten the elastic to your desired length. plus about an inch and then cut it. Sew your ends together and tuck them back in the casing. stitch over your hole and you're done!

If you don't have enough elastic to do it that way or your want a more finished edge you can fold over your top just a bit to conceal the edge and then fold it down about an inch and a quarter and sew it down leaving a small opening to insert your elastic. Feed it through with a safety pin and finish as described above!

Now, shamelessly chase your toddler around with a camera while she models the new pants. Give up when she hides in her bunk bed.
I know I dont explain things the best, so like I said, please don't hesitate to contact me if you need more help!