Congratulations to the following winners. You have until 11:59 PM EST on Sept 25th to claim your prize.
fairytales and fireflies $25 Gift Certificate- Amy Stock
Tiny Hands Creations $25 Gift Certificate- Shanna Uptergrove
Chloe Belle Boutique $25 Gift Certificate- Tamie Wixom
Lovey Baby Boutique $25 Gift Certificate- Nikki Zoshak
Owl About You 3T turkey Set- Chancey Mahealani
Fairytales and fireflies $25 Gift Cerificate - Andrea Hendrent
Halloween Printables pack by Creative Elements Designs - Samantha Odo
FOE grab bag by Cute-Z-Crafts - June Sonntag
Icing on the Cake {by Betsy} $25 Gift Certificate - Naomi Corona
8 flag banner by Banner Bananer - Mallory Baird
Personalized Stocking from The Little Joy Shop - Cynamin Kiss
A Pocketful of Sunshine $25 Gift Card - Shaylan Mitchell
Surprise dress from JOEY Dresses by Amy Rey - Cynthia Baldonado
Kiwi and Kiki $35 Gift Certificate- Jen Buckley Garza
Dazzling Diva $25 Gift Certificate- Nikki Misiura
Princess London's Tutus $25 Gift Certificate- Bobbie Lyn Stephenson
Lolafina $25 Gift Certificate- Nadja Szabo
Dandelion and Daffodil $25 Gift Certificate- Jess Isaly
Kenna's Klippies and Bows $25 Gift Certificate- Gail Gray
Surprise Necklace and Headband from The Geek Bowtique- Sarah Suprak Spencer
Heavenly Made With Love $25 Gift Certificate- Becky Mennig
Chris~Cross~Crafts $25 Gift Card - Rebekah Vannatta Roth
Sibling Set from Purple Princess Shop - Sarah Harden
Embroidered shirt and bow from Sugar Dumplins Bowtique- Chelsea Cardwell-Walter
Ksw3Designs $25 Gift Certificate- Mary Jane Vanderbles
Sweet Little Bow Shop $25 Gift Certificate- Faith Cooper
Monday, September 23, 2013
Tuesday, March 1, 2011
And the winner is....
The winner for the shirt giveaway was comment #17!

Livia, please contact me so we can discuss your custom shirt!
Thank you so much to everyone for participating and spreading the word!
Sunday, February 20, 2011
Time for a give away!

The winner of this give away will win one personalized shirt up to size 6!

Ready to win? It's simple!
1. Follow the blog (1 entry)
2. Like us on Facebook (1 Entry)
3. Tweet about this giveaway (1 Entry)
3. Blog about this giveaway (2 Entries)
4. Post about the giveaway on Facebook (2 Entries)
That's it! A winner will be chosen at random on Feb 27th. Limited to US entries. Once a winner is chosen they have 48 hours to respond before a new winner is chosen. Please leave one comment for each entry!
Monday, January 24, 2011
Have you tried Pintrerest yet? No? What are you waiting for?
Pinterest is a website for visual bookmarks with an added bonus of being social. Instead of having a million folders of bookmarks and a folder on my desktop for photos of inspiration I can now organize all my favorite things in neat little boards.

You can browse others virtual bulletin boards and repin their ideas. You can follow your friends and have their inspirations guide you in gift giving. You can create a virtual recipe box complete with drool worthy pictures. But a warning- you can also get lost in this awesome little eye candy world for hours!
Thursday, January 13, 2011
Quilt Along: Step 2
After the left step you should be left with a bunch of paper squares with a strip of fabric glued across the diagonal.
Lay one of your strips over your constant strip right side down. Sew along the edge using a 1/4th" seam allowance.
REDUCE YOUR STITCH LENGTH!! I normally keep my machine at a 2 or 3. For paper piecing you should reduce it to somewhere between 1 and 2. You'll need to play around with your machine to see what works best for you. You want your stitches to be small enough to perforate the paper and make it easy to tear away yet if its too small the paper tears away on its own when you are sewing.

Finger press the seam open and repeat on the other side of the strip.

Press both sides open.

I'm a big fan of not pressing my seams but its necessary with this method. If you absolutely can not stand the thought of ironing at least make sure to hold your strips taunt when you apply the next strip.
Work your way out until you cover your entire square. It should look something like this:
 Press your block a final time and then flip your square over and use your paper as a template for trimming up your block.

That's it! You completed your first block!
Lay one of your strips over your constant strip right side down. Sew along the edge using a 1/4th" seam allowance.
REDUCE YOUR STITCH LENGTH!! I normally keep my machine at a 2 or 3. For paper piecing you should reduce it to somewhere between 1 and 2. You'll need to play around with your machine to see what works best for you. You want your stitches to be small enough to perforate the paper and make it easy to tear away yet if its too small the paper tears away on its own when you are sewing.
Finger press the seam open and repeat on the other side of the strip.

Press both sides open.

I'm a big fan of not pressing my seams but its necessary with this method. If you absolutely can not stand the thought of ironing at least make sure to hold your strips taunt when you apply the next strip.
Work your way out until you cover your entire square. It should look something like this:
 Press your block a final time and then flip your square over and use your paper as a template for trimming up your block.
That's it! You completed your first block!
Wednesday, January 12, 2011
Quilt Along: Step 1
Ok! So several of you are having mini panic attacks over this.
Stop! Take a deep breath. This is fun, remember?
I know the unknown is always a bit panic educing but you're making it harder than it needs to be, I promise!
I'm making a large throw size. I've worked out that I want my blocks to be 8.5". I will arrange them in a 6x9 fashion so that my finished size before boarders will be 48" x 72".
I selected my square size based on the paper I have on hand and based my dimensions off of that. Remember, you will lose 0.5" of each block due to seam allowance.
Step One: Cut your squares. Pages out of a phone book work extremely well. The thinner the paper, the better. I used regular printer paper because that is what I have on hand.
If you use printer paper you will be cutting a 2.5" strip off of the top of each page. (save that strip, perfect for hexagons!)
Step Two: Cut your 1" constant strips. If you're using an 8.5" square these strips will be 12" long. If you are not using a constant you can just pull from your scrap pile and cut one 1" x 12" strip for each block.
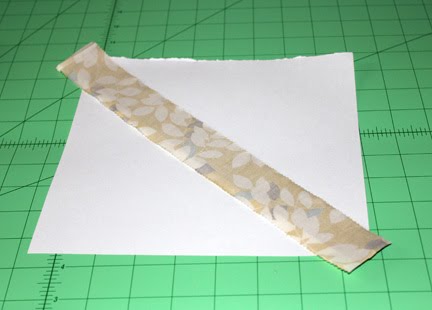
Step Three: Using your glue stick attach the constant fabric across the diagonal of your paper square. I use just a spot of glue at each end. They should look like this:

Tomorrow we will work on construction of the rest of the block!
Sunday, January 9, 2011
Hopefully you've started to gather your fabric for our quilt along! Here is a list of supplies that you will need.
- A quilting ruler and rotary cutter will be extremely helpful when you're trimming up your blocks.
- Paper or muslin for piecing. You would need one square for each square of your fabric. The thinner the paper, the easier it will be to rip off. I suggest using an old phone book.
- glue stick
- Thread- for piecing I generally just use white. You'll want a coordinating color for your quilting.
- Batting- I prefer Warm & White or Warm & Natural for cotton batting. You may also use bamboo or a polyester if you choose.
- Basting pins (safety pins will work!) or an adhesive spray.
- Either a walking foot or free motion quilting foot is highly recommended. If you would like to do simple straight line stitching you can make it through without a walking foot if you don't want to make the investment. A walking foot just makes things easier.
Subscribe to:
Posts (Atom)